Sunday, April 8, 2012

1750 Points in 1 week!

Hey guys, long time no see, I was busy with my life and it took place on my hobby time but I guess you all know how it works. And I just end up with this situation : I have to pint my all army in one week.

Knowing that I will have to work my ass on for this project I decided to do some small investment I been to the closest handyman shop and bought two lamp with light bubble to have no shadows and real colors to work with.
Here how my set up looks like :

Then I made myself a Wet Palette, which is a must to anyone who have some paint job to do, I could keep my paint wet for a week!


After that let's get painted! Having only a week to do my job, I can't have too high expectation so I'll follow this mindset : first have a global look on my army, then if I got time I'll get more in details for each unit. Pretty simple you might say but I think it's important to do something like that and don't get too focus on the details for now.


Some of my Lava bases in their process, I stop them after I got a simple transition of colors (which you can't see on this picture), I hope I'll get some time to add more details like lava flow.


Here my 3 barges after a first dry brush, I used the new Dry paint from the new GW line, I'll give my thoughts on the new line later.

Here after a first wash.

So I have to come back to my paint job, and for sure this time I'll keep you tuned with my work, because I have to!

Did you guys also had such a short deadline to paint an army, feel free to share your experience and tips.

Friday, March 16, 2012

Dark Eldars Vs Necrons Battle Report


Hey guys, I was playing with the Idea of WWP list with Grots. When I checked synaps3 blog and he's beautiful army I just get this bump of "I want to do something like that as well". So I started to make a 1750 list taking in account his advices, and ended up with something like that :
Archon : Agonizer, Blast Pistol, Combat drugs, PGL, Haywire Grenades
Haemonculus : liquifier, WWP
Haemonculus Ancient : Agonizer, Casket of Flensing, WWP
8 Grotesques : Abberation with Scissorhand.
5 Warriors : blaster
7 Wyches : Hekatrix with Agonizer
5 Scourges : 2 blaster
5 Scourges : 2 Heat-lance
Beast Pack : 3 Beast Master, 1 Clawed Fiends, 5 Khymera, 2 Razorwing Flocks
Talos : chain-flails, TL Heat-lance

I asked my buddy if he could play this army (lot of proxy of course) against my 1750 tournament list which can be found here. So let's check how both army works.


Fairly cover on all the table, Seize ground with 4 objective. One center, one on the left and two on the right. Spearhead deployment, DE win the roll off and decide to go on the right bottom corner, letting the Necrons with the less cover corner. 

Drugs : reroll to wound, DE deployment, Grotesque Haemi, and Archon deploys as much in front as possible, spreading to get a Haemi on each side of the pack.

Necrons deployment, 
Scarabs in front in cover ready to shield. Both AB in front to shoot. One squad of warrior in cover on the back with GA on the side. On the Center, a little bit in the back Warriors,GA, DL and praetorian + C'tan to counter charge.
Flayed Ones, in reserve

No size

DE Turn 1 : Grotesque pack advance 6", both Haemi unleash WWP, one is close to center objective, the other on the right side.

Necrons Turn 1 : WA, GA, DL & Praetorians, C'tan move to the right. CCB Zoom on the right, Scarabs spread to shield AB. The rest stay stationary
All the shooting kill a Grotesque, The Abberation lost a wound, the normal Haemi lost a wound, and a grotesque is down to one Wound.
They're really resilient

DE turn 2:
Reserve roll : One wyches, one kabalites warriors, Scourges with Heat lance, one Talos get in.
Grotesque move forward center, Wyches goes form the right WWP to get cover close the upper right objective. Kabalite come from table edge to get the bottom objective later. Talos come from left WWP.
Wyches run 6" in cover. Grots, Kabalite, Talos run 5" forward. Scourges destroy the CCB, Overlord pass pinning check.

Necrons turn 2 : Flayed Ones come. They go on the right where the Kabalite are in the open. Both AB move back. WA, DL & Praetorians, C'tan move backward a little bit. Overlord move in cover on the right close to the wyches  Scarabs move to engage the grots.
C'tan and Wa shoot to death the Scourges. Both AB, 3 Wa squads shoot at the Talos but only put 3 Wounds on him. GA rapid fire the Wyches in cover killing 2 of them.
Flayed assault the Kabalite unit, killing them all without loosing any of them.  Overlord assault Wyches killing one of them and don't get any wound on him even with the reroll!
Scarabs assault the grots, the Haemi/Archon/Grots put 10 wounds on them before they can attack, all the attack of three bases go on the archon, he fails one of his save, his Shadow Field is gone. Then one more dies and an other is down to one wound because of fearless save. But they've done their job, the grots are locked for the next turn.

DE turn 3 : 
Reserve roll : everything comes except for the second wyches unit.
Talos comes from right WWP to charge the Overlord in combat with Wyches. Beast Pack come from the left WWP. Kabalite come from table edge to shoot the Flayed ones. 1st Talos move toward the AB. Scourge comes closer to the GA on the left.
Talos shoot Heat-lance at the AB destroying it. Kabalite rapid fire the Flayed killing one who didn't come back. Beast Pack run 5" forward. Scourges don't succeed at doing anything to the GA
Wyches put a wound on the Overlord, then he put one on the Talos eventually dying from the Talos attacks. Talos and Wyches consolidate in direction of the objective. Grots finish off the scarabs and consolidate forward.

Necrons turn 3 :
C'tan come closer to the Talos on the right objective. AB, WA, DL & Prae move backward. GA get in position to rapid fire the wyches on the objective. The other to rapid fire the beast pack. Flayed ones move to charge Kabalite.
C'tan shoot at the Talos but he saves thanks to FNP. GA and WA inside shoot at the Wyches in cover killing them all. Cryptek from WA on the top of the board finish the last wound from the first Talos. AB shoot the grots and kill one. One squad of WA, GA and the WA inside shoot at the Beast Pack and Scourges , killing 3 Khymera and putting a wound on Clawed Fiends and both Razorwing Flocks, the scourges die from the firepower.  The beast Pack pass moral check.
C'tan assaults the Talos, then both inflict a wound on each other. The Flayed Ones assault the Kabalite and wipe them out consolidating a little bit backward in case the wyches comes from the portal.

DE turn 4 :
Wyches comes from reserve. Grots move forward. Beast get closer to the warrior squad in cover. Wyches get in cover on the bottom right objective. 
The Ancient Haemi shoot his Casket of Flensing at the WA in front of the DL & Praetorian. But roll 1 to the Dice for wound. Even the blast pistol from the Archon doesn't wound the squad.  Beast Pack run in direction of the WA in cover.
Beast Pack needed a five to assault the WA but only get 4 out of three dices. C'tan and Talos look at each other but don't put succeed to wound the other one.

Necrons Turn 4 :
GA on the right move to get the Wyches which came from reserve in range.  Flayed ones move toward the Wyches. Left GA move between objective to get Beast Pack in rapid fire. AB move backward. DL & Praetorian get close to the Grots to charge.
One wych dies from the GA. WA + WA/GA rapid fire on the Beast Pack killing all the Beastmaster, Clawed fiends and putting several wounds on the razowings. They don't pass the moral test and fall back of 7".  WA/AB/Praetorian shoot the grots, killing one and normal Haemi. 
C'tan put a wound on the Talos, he's down to one, the Talos pass ld check.  DL move to engage the Archon and Abberation, the mindshackle choose randomly between Anciant Haemi, Abberation and Archon, get the archon and fail his test. He finishes off a grots. Then grots and  Haemi Ancient attacks killing the DL and two Praetorians. Praetorians kill the Archon. One dies from fearless but then DL and 2 Praetorians get back up. Flayed Ones don't succeed to assault the Wyches in cover.

DE Turn 5 :
Wyches move to engage the Flayed ones. Beast Pack can't rally because of the GA less than 6" away and fall back 12".
C'tan and Talos fail to wound each other. Mindshackle a grot who puts a wound on his buddy. Ancient Heami kills the DL with his Agonizer, then the grots attacks the Praetorians, and none of them are dead. Praetorians passed 8 3+ saves and then finish off a grot. DE loose combat but pass ld check. DL doesn't come back. Wyches charge Flayed Ones wiping them out and consolidate back in cover on the objective. 

Necrons Turn 5 :
WA in cover move in direction of the left objective, WA from the center GA disembark and move on the center objective. The GA move 12" in direction of the right Wyches to get in range. RIght GA get in range of Rapid Fire. Top Warriors move clove to the Big Assault.
GA on the left and Rapid Fire from GA/WA don't kill any wyches with their 4+ cover save and FNP. Left WA run and grab left objective.
C'tan and Talos still look at each other. Grots and Haemi Ancient finish off the Praetorians and consolidate on the left objective. 

We roll off to see if the game end and it's a 1. So at the end it's 2-1 objectives for the Necrons.

So a really close game, with a lot of stressful moment. Like always my Necrons surprise me, when it comes to the first 2-3 turn I always think how I'm gonna pull off something from all the threat that are in front of me? But Necrons being pretty resilient if you apply coordinate fire power they can really shine. About this game I think I've done pretty good choices to hold back as much as I could and play the mission. I focused on the troops of my friends because I know they're not that tough. I also used my superior speed with my GA which is pretty ironic when you think that my Necrons were faster than the DE. My luck in my dice especially when the Praetorian charged the Grots and hold them longer than I expected really helped. I'm learning more and more every time I'm playing my Necrons (which doesn't happen as much as I would like to), theory hammer is nice but nothing is better than experience. 

About my DE list, I also learn quite a lot, I think I will wait until the 6th edition before buying for more than 100€ of Grots but I really enjoyed how the army turned out. Even if my friend made few mistakes with the army, it's normal for a first time playing it, I would have done the same. There is so much possibilities on the deployment thanks to WWP. The grots mob is really hard to put down even if it's sooooo slow. The DE are really a glass canon army, when they strike they strike hard but can't get much fire power back at them. After I finish my Necrons for the different tournaments I should participate I will have fun painting. I will probably paint a Tyranids unit then DE units so I don't get bored about it. 

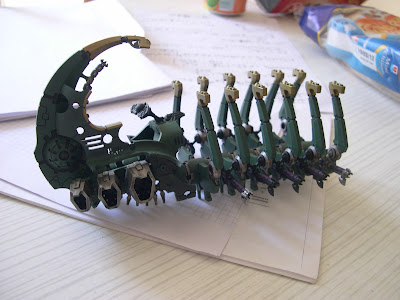
And here some WIP of my Ghost Ark, this guy take forever to paint with so many pieces to paint separately. Hopefully I'll finish it this week.



Sunday, March 11, 2012

Praetorian and lava bases test

Okey guys still working on my necrons army, and for those who checked my schedule, I might say I was quite optimistic. Mixing my life being a student and this amount of Hobby is pretty hard. In two weeks I'm going back home for a work placement, so I will have much more time to put on my painting.
Anyway, I'm working on my praetorians now. I love the model, I love their fluff, I love a little bit less the rule but I still found a use for them. Without waiting, here the pictures :


So I decide to go with the green/gold and all the energetic part will be in purple. I like the combination of green and purple because the purple still make a contrast with the green but don't catch too much of the attention like a red would do. This model was nice to paint (I think any model is nice to paint when it been such a long time I haven't been painting) but for all of those who want to build their Praetorian, I recommend to keep the "jump pack" part before painting, because I couldn't access to the main "power orb".
During my painting session, I came up with a problem, my fine detail brush is dead. I was trying to do the highlights with a bigger brush, but it didn't end up as clean as I wanted and I was spending more time swearing that actually doing the highlights. I'll order my new brush today, hopefully I will receive it before I move back to my place... Anyway, after doing the green highlights I was so pissed agains my brush, I just decided to stop with highlights before I get my brush that's why the gold parts are not finished yet.

Now I will need your help guys, I don't know how to paint the pistol part. Do I go for metallic, green like the armor, gold, purple, I really struggle to make a choice. So it would be you my dear readers who's gonna choose for me!

Now let's move to the lava bases, here the pictures :

I'm pretty happy with how they turned out, I tried different stuff on this awesome product from Dark Art Miniatures. First they were much more red oriented, but as much as I was checking pictures on the net, I just said that being hotter the color should go more toward a yellowish one. Like I said, pretty happy with the result and I think it's really pop more than a basing sand/tufts base. And thanks to the Salamanders army out there it gave me the inspiration for my green necrons on lava bases.

What do you think about all of theses, any advises, criticism. Being a pretty rookie painter any feedback is welcome.
And of course I'll keep updating as much as the army goes.

Tuesday, March 6, 2012

1750 Pts to paint up in less than one and half month


The title is pretty explicit, I got a tournament in April 14th and after painting really few of my necrons I just decided that I didn't like much my paint scheme, so I'm going for an other one. After some tweaking I changed my list for the incoming tournament so here the list of stuff I need to paint :
Destroyer Lord & 5 Praetoriens
Command Barge & 2 Annihilation Barge
20 Warriors, 4 Crypteks
30 tiny Scarabs (6 bases)
5 Flayed Ones, C'tan
And all the bases that comes with it.

When you have such a short deadline you have to plan how and what you will paint. That's why I planned some painting time EVERY single day. My painting time will be split in two part, one part for the troops and one part for the Vehicles. That why the army can build up constantly and I can manage more easily if I make some changes in my schedule.
For example : now here you can see my schedule for this project :

As you can see, I will be quite busy but that might be expected for such a short deadline. Here you can see that I got few days where there is few or nothing to do at the end. I will use that time if something went wrong and I need more time to finish up some stuff. It's better to plan a shorter deadline and if you messed up you still can manage (somehow) to finish in time. 
So far I'm following that schedule, but I just started yesterday so it's still quite easy!

I'll keep you tuned with pictures as soon as I finish anything. 
Until then, I would like to get some insight of people who had such a project of really short deadline painting.


Wednesday, February 22, 2012

Dark Art Miniatures Lava Bases Review

Hey guys, now that my girlfriend is back to her country I can focus on the Hobby. For my ongoing Necrons army I decided to go for some resin bases. It's the first time I'm using some of them. I ordered quite a lot of the Lava Bases from Dark Art Miniatures. Let's have a look on them.

Two things made me chooses them. They have a lot of different cuts and doesn't look to much like each other (one of the problem I found in other companies) and the price which is really attractive for resin bases. They propose a bundle which make them even cheaper.

Something like two weeks later I received my order at my place and was really excited to open the bag.

So far I'm really pleased with this product. There are really few amount of mold flash. There are some small casting issues like air bubbles but when I see the overall quality of this product I can't complain. I'm currently painting some of them to have an idea of how it's turn out. The pictures will follow really soon.

So once again I can just recommend you to have a try for resin bases and this particular company. It's really looks better than just some sand and tufts on a base. For sure there are some really nice DIY bases but if you're like me and your modeling skills are quite limited just go for it, you won't be disappointed.

Now a question for you guys. I got those 60mm bases that I want to use for my flyers and my Destroyer Lord but I don't know how to drill the base. What tool should I use for the drilling part? Should I wait before painting them? Or I can just paint them and drill afterward? 
Please share your experience with me!

Wednesday, February 8, 2012

Battle Report 1750 pts : Necrons vs Khorne Daemons


So here once again a battle report for my next tournament. Today will be an other mission so test out and an other army both for my opponent and myself.
So first thing first the mission : 3 objectives on the middle line, one in the center and two at 18" from the center one on each sides. Any unit which is not vehicle can pick up an objective if it touch it during its movement phase. Embarked unit should disembark to pick it up. Each objective held is worth 1 point and 2 points if it has been brought back to our deployment zone. A unit can only grab one object. Special rule : Night Fight starting at the 5th turn. Deployment : Pitched Battle
Pretty interesting mission from my point of view. I decided to change a little bit my list because my tournament being in april I want to be sure to have all the model ready before it. I've been proxying my Wraiths until now. I'm not sure if GW will release them before april and I don't want to convert six of them so I have to do with what I got. So I came up with the Destroyer Lord + Triarch Praetorian combo.
Here my list :
HQ :
Overlord : Catacomb Command Barge, Warscythe 180 pts
Royal court : 4 Cryptek of Destruction with one solar pulse 160 its
Destroyer Lord : Mindshackle Scarabs, Resurection Orb 175 pts

Elite :
5 Flayed Ones 65 pts
5 Triarch Praetorians 200 pts
C'Tan : Lord of Fire, Pyreshards 210 its

Troops :
5 Warriors + Ghost Ark : 180 pts
5 Warriors : 65 pts
5 Warriors : 65 pts

Fast Attack :
6 Canoptek Scarabs : 90 pts

Heavy Support :
Annihilation Barge : 90 pts

My opponent brought a Khorne Daemon list because I know that two people are bringing Daemon lists (one full Khorne and on other one full Slaneesh) so I can see how its fare and give me more experience against Daemons in general.
His list :
HQ :
Bloodthirster : Unholy Might 170 pts
Skulltaker : Juggernaut 175 pts

Elite :
4 Bloodcrushers : Fury of Khorne, Chaos Icon, Instrument of Chaos 200 pts
3 Bloodcrushers : Chaos Icon 145 pts

Troops :
15 Bloodletters : 240 pts

I won the roll off and decided to go second so it will give more option end game and give me one more turn of shooting against the red horde.
Deployment : D-Lord, Overlord, C'tan deployed behing a big piece of terrain in the center part of my deployment zone. Ghost Ark and Annihilation Barge on each side of them. One unit of Warriors went on the left close to my D-Lord. The other went to the very right side in a piece of terrain. And the Scarabs on the very left side ready to go in cover.

Daemons Turn 1 :
Movement : He rolled for his wave and got a 2 so it's gonna be his second wave. Bloodcrushers + Skulltaker wanted to land just behind the terrain in front of my center line but scatter 7" backward. The Bloodletters landed right were the BC+Skull wanted to land. The other Bloodletters unit landed in the middle of the board on the right flank behind terrain but scattered 6" inside and he lost 4 BL due to dangerous terrain.
Shooting : He just ran forward

Necrons Turn 1 :
Movement : On the right side my Ghost Ark move 12" to have a clear shot on each of the BL. Everything move 6" forward to have LoS except for the right Warriors who stayed put to shoot. The Scarabs on the left move in cover.
Shooting : Right Ghost Ark open fire on both units of BL killing 5 and 3 of them. Warriors on the right and C'tan kill three of the right BL. The left Ghost Ark + embarked Warriors kill 4 of the center BL. The left Warriors, and both Annihilations barge succeed to put down to one wound all the BC and Skulltaker include. I felt really bad for my opponent at that moment because despite the fact that he had a cover save he just couldn't pass them.

Daemons Turn 2 :
Movement : Two units of BL and the last unit of BC land center with the Skulltaker unit Chaos Icon to put a lot of pressure on my line. The rest move forward. One of the BL pick up the right objective.
Shooting : One of the BL run in cover. An other ran forward but keep enough place for the Skulltaker unit to charge the right Ghost Ark. The rest just run forward.
Assault : One of the BL charge the D-Lord and Praetorian (I really made a mistake letting them here) wiping them out even if the Mindshackle kill two of them. They consolidate forward and the D-Lord pass his Reanimation Protocol. The Skulltaker unit assault the right Ghost Ark and only succeed to glance it once destroying on of its gauss flayer.

Necrons Turn 2 :
Movement : The Flayed Ones stayed in reserve. The Overlord fly flat out over the BC unit putting 2 wounds on them. On the left part everything move 6" backward. In the center, the D-Lord move to charge the BC unit, the C'tan ready to shoot and charge the remaining BL. On the right, the Annihilation Barge move 6" Backward and the Ghost Ark 12". The Scarabs spread out to make a wall in front of the left flank.
Shooting : The C'tan shoot at the BL and my opponent did 4 six for his saves. On the left, Ghost Ark + 2 Warriors unit rapid fire a BL unit killing only 4 of them. The left Annihilation barge put one more wound on the BC and kill one. The right one kill two BC from the Skulltaker unit.
Assault : I charge the BC just to use hist Mindshackle and kill one or two of them. Mindshackle passed putting one wound and killing an other one. The BC don't hurt him and he finished them off. That was a big surprise. The C'tan assaulted the BL killing 2 of them and getting one wound back. One more dead due to fearless. Only one BL remain.

Daemons Turn 3 :
Movement : Bloodthirster landed on the center right thanks to the Icon. The Skulltaker unit grab the center objective. One unit of BL move in cover close to the D-Lord. The other unit move to assault the Scarabs wall. The right BL move forward.
Shooting : The right BL run 5" forward to put pressure on the warriors. BT and Skulltaker run in cover.
Assault : Multi assault from the BL on the C'tan and D-Lord. Mindshackle passed : 1 dead. C'tan kill one and D-Lord two. Then the BL killed the D-Lord and the C'tan passed all his saves. 2 more dead due to fearless. The D-Lord got back up.
The BL wipe out the scarabs and consolidate forward.

Necrons Turn 3 :
Movement : Flayed ones stays in reserve. D-Lord flys toward the Bloodthirster. The Overlord fly over the Skulltaker unit killing one BC, only the Skulltaker with one wound remains. The right Annihilation Barge move to get LoS on the Skulltaker. The right Warriors move forward to rapid fire some BL. On the left flank everybody move to rapid fire the BL.
Shooting : On the left the combination of two units of Warriors, Annihilation Barge and the Ghost Ark finish off the BL unit. On the right, the Ghost Ark and its Warriors finish off the BL. The right Warriors kill the Skulltaker. The Annihilation Barge put a wound on the Bloodthirster.
Assault : D-Lord assault the Bloodthirster but the Mindshackle doesn't succeed so the Bloodthirster kill him and consolidate on the center. The D-Lord got back up. The C'tan kills 3 BL got no wound back and 3 more died due to fearless.

Daemons Turn 4:
Movement : Bloodthirster move to engage the C'tan.
Assault : Bloodthirster put two wounds on the C'tan. The C'tan kill 2 BL but loosed his last wound. Both BT and BL consolidate in cover.

Necrons Turn 4 :
Movement : Flayed ones arrive on the left flank. Everybody move to shoot at the last units.
Shooting : I finished them off and wipe out his all army.

Interesting game : the Daemons can put a lot of pressure and I think the game would have been completely different if I wasn't that lucky with my D-Lord. So I will continue practicing with this army to get more used to the Praetorians+D-Lord combo.
Keep tuned


Tuesday, February 7, 2012

Triarch Praetorian

Hey guys, been a while, like everybody I got an excuse for not getting post in time, this time it's my girlfriend who came to visit me. But back to the main subject : Triarch Praetorian. When I first saw the model I was like wow they look so nice with their special jump pack. But as soon as I rode their stats line I just though that I will never use them. I mean when we see their point cost and what they do the normal reaction would be why this guys do even exist when the Wraiths can do everything they do and better? So point for point it's pretty obvious but the last few days I just came back with an idea I had for a while : using Praetorians with Destroyer lord.
So yes this unit is expensive at 390 pts a pop but it really impressed me so far. I use Void Blade and Particle Caster on my Praetorians and I put Mindshackle Scarabs, Weave and Res orb on the D-Lord. This unit is really a good answer to pretty much everything. I mean it can take after vehicles and infantry. Yes I said infantry. Everybody says that they suck, and by themselves I agree but with the D-Lord they become much scarier.
This unit can use the pistol so soften if lucky the unit they want to assault. I will usually got my full squad to the opponent face thanks to the high mobility they got (here avoiding landing on terrain is important because at 40 pts a pop you don't want to lose a guy for a miserable roll of one). I don't care if I assault through cover or no because anyway they will hit last. They will probably loose a couple of guys before striking back and they can kill a couple of guys as well with their attacks.
But it's not where they are interesting, it's because they bring along the D-Lord. He's the one who's gonna make the damage with his 4 attacks on charge with preferred enemy (everything) you are sure to land at least 3 attacks and with strength 7 it's most likely to be 3 dead guys. Then you have Mindshackle which can wreck havoc for you opponent because a main force of his unit is used against him adding more damage.
What I've been reading is the Praetorian sucks because they can't assault energy weapon units and I say why not?! Sure if it's a unit of 10 I wouldn't try but a normal unit of 5 I'm not afraid. With the mindshackle of the D-Lord and the toughness 5 of the Praetorian it's unlikely that the whole squad will get slaughtered. Even if I loose combat the Fearless come in handy. And then I got the Reanimation protocol on 4+ thanks to the D-Lord.
This unit became really useful for me because my Necrons army being pretty shooty sometimes I have to buy myself a turn or two when something is closing the distance between both battle lines. And this combination just fill that roll perfectly for me. Sure it's expensive but it's can really surprise my opponent and it's more of a swiss knife.
It takes an Elite slot which free up a Fast Attack one. I think (like a lot of people out there) that the Fast Attack slot is the more interesting one of the codex so having one more of there is still welcomed.
The only thing that I need to be careful is the casualty this unit can take, I mean if I feel that they can kill the 5 of my praetorian in the same phase I won't bet them. Because I need at least one of the guy standing up to use my Reanimation Protocol, other than that I'm really pleased by this surprising unit.
What do you guys think about that? Still not worth Wraiths? Or just too expensive? Just leave a comment on your thoughts
Keep tuned

Tuesday, January 31, 2012

White Dwarf and my thoughts

Okey guys, just got the last White dwarf. I must say that once again I'm really disappointed by it. I've been taking and reading every months for almost a year and I must say as a Warhammer 40k player and only Warhammer 40k player I just have the feeling that we just don't have enough. I mean the magazine is quite expensive (7€ in my country) and even if I know it's more an display magazine than anything else there is not enough. I mostly like the painting tips by 'Eavy Metal so usually I can get them from the different part of the book, so it's fine but for the rest... I know it's pretty much a whining post but it's just the feeling I got especially with the last release.
I'm just saying : More w40k in the White Dwarf. It's pretty famous to go on striking in my country and I would but just got the feeling that being the only one won't get the attention of GW...

Thursday, January 26, 2012

An other funky scenario agains Tyranids


Hey guys, an other play testing for my next tournament this time it was against Tyranids and an other scenario. After reading quite a lot about the Null Deployment theory we wanted to try out this new way of fielding one of my favorite army.
So let's begin with the scenario :
Deployment : Dawn of War
5 Objectives : one in the center of the board and one in the center of each table quarter.
- Objectives held in our deployment zone are worth 1 point
- Objectives held in our opponent deployment zone are worth 2 points
- Objective in the center is worth 3 points
- Only one objective can be held by a unit.

My friend list, we were both working on it because as a Tyranids player it was a really interesting exercise, we ended up with that :
HQ : Hive Tyrant : Wings, Hive Commander

Elite : The Doom of Malan'tai

Troops : 20 Termagants in Mycetic Spore
20 Termagants in Mycetic Spore
15 Genestealers
15 Genestealers

Fast Attack :
6 Raveners : Rending Claws

Heavy Support :
Trygon Prime : Adrenal Gland

1750 pts

I'm taking the same Necrons list and we'll see how it fare against the big bugs.

The Board : 3 pieces of terrain in the upper part of the board, 3 in the middle line and 2 in the lower part.
Necron win the roll of, I decided to go 2nd to grab some late game objectives. The Tyranids took the upper part of the board even if he held everything in reserve.
Deployment : I push everything as fare as I can on my side of the board. The Command Barge and the Warriors are close to the center objective and the Immortals close to the left one of my side of the board.

Tyranids turn 1:
Nothing happened he got everything in reserve

Necrons turn 1:
Movement : The Scarabs and the C'tan took position in cover in the center of my zone. The Wraiths went left with a Ghost Ark. Both Annihilation Barge zoomed 24" on the right to get a good position. The other Ghost Ark went to the right as well. Warriors and Immortals moved up in cover. The Command Barge move forward a little bit.
Shooting : I ran couple of stuff and pop the Solar Pulse

Tyranids turn 2:
The Tyrant, both brood of Gants, the Trygon Prime, one brood of Ravener and the Doom are coming in from reserve.
Movement : The Hive Tyrant landed on the right side close to my Ghost Ark and Annihilation Barges. Trygon landed in cover in the upper part of the board after scattering 11" backward. Both Gants brood landed on each of my zone objectives. The Doom scattered a little bit forward and landed close to my scarabs. And the Raveners landed pretty much in the center but couldn't get into cover.
Shooting : Trygon, Raveners, Tyrant ran forward. The mycetic spore and the Gant on the left side shot at my Immortals killing two of them but they both got back up. The Doom shot at the Scarabs putting two wounds on a base but loosing 3 due to its power, its mycetic spore killed one base.

Necrons turn 2:
Movement : Command Barge moved 12" over the Trygon causing 2 wounds on him and the Overlord disembarked ready for assault. The Scarabs closed the distance between the Doom and them. The Wraiths on the left side went more center to get to the Raveners. The C'tan went to the direction of the Tyrant. The Ghost Ark on the right moved 6" to target the Raveners and the left one did the same to target the Gants. The Annihilation Barge moved so they can get clear shot on both Tyrant and Raveners.
Shooting : On the left side, the Immortals, the Ghost Ark and the Warriors inside shot at the Gants killing 12 of them but they passed their leadership. In the center, Ghost Ark and the Warriors inside + the Warriors on foot shot at the Raveners killing 3 of them. Both Annihilation Barge shot at the Tyrant causing 2 wounds.
Assault : The Overlord assaulted the Trygon, Mindshackle Scarabs test passed by the Trygon, then the Overlord passed his invul saves and put two more wounds on the Trygon. The Wraiths assaulted the Raveners putting 5 wounds on them and getting none in return. The last Raveners died due to Fearless saves. They consolidated 4" in cover. Scarabs assaulted the Doom loosing one base and putting one wound on him. The C'tan then assaulted the Tyrant loosing two wounds but causing one so the Tyrant is down to one wound.

Tyranids turn 3:
The rest of his army come in. Both outflanking Genestealers rolled for the right side.
Movement : One brood of Genestealers came on the upper part and the other on the lower part behind the Termagants. The Raveners landed on the left Objective of his deployment zone. The left Gants are subject to instinctive behavior while the right side brood passed his Ld check.
Shooting : Raveners and the Geneastealers in his zone ran in cover. The left Gants and their Mycetic spore shot at the Immortal doing nothing. The right Gants were out of range of the Warriors on the center objective.
Assault : Scarabs took 1 wound while getting the Doom down to 2 wounds. The C'tan finished off the Tyrant and consolidated in direction of the Gants. The Trygon failed his Mindshackle Scarabs test but didn't hit himself but the Overlord succeed to put a wound on him.

Necrons turn 3:
Movement : The Wraiths moved left to counter the Raveners. Both Annihilation Barge on the right moved to get clear shot on the Genestealers. C'tan moved close to the Gants and the Doom.
Shooting : The Warriors inside the Ghost Ark on the left side shot at the Mycetic Spore instakilling and the sponsons of the Ark killing one Gant. The Immortals and the Warriors on the center shot at them as well killing 4 more. The Gant then failed their Ld check and felt back 3". Both Annihilation Barge shot at the Genestealers in the open killing 5 of them, and they failed their Ld check... falling back of 4". And the Ghost Ark and the Warriors inside shot at the Gants killing 12 of them and the also failed their Ld check, falling back of 4" as well.
Assault : The Doom was slain by the Scarabs, they consolidated in cover. The C'tan assaulted the Doom's Mycetic Spore killing it and consolidated 5" in direction of the Genestealers so they would be within 6" of  him. The Trygon got Mindshackled again but didn't hurt himself but the Overlord finished him off.

Tyranid turn 4:
At that point with the Gants and Genestealers being accompanied off the board. We just saw that in the best scenario my opponent could get 4 points and I assured 5 so we called the game.

It was a really interesting game, I really like the idea of the Null Zone Deployment for the Tyranid, if you could have seen my face when he landed all his bug in front of me I wouldn't think it will ended up this way. I think his list need more work cause the problem with Tyranids is the point cost. It's impossible to squeeze everything we want into the list so every element need to work perfectly. I think he will need some more Synapse cause it was a problem for the Gants and Raveners with only the Tyrant and Prime covering this field. My army did unexpected well but I need more games to really get everything from it.

The Scenario is quite interesting as well cause you are always calculating in your head how many points will I get if I try to get this objective, wouldn't be more cautious to keep the one in my zone, can I hold the center one?

What you think can help us for the Tyranids list and what about the outcome of this battle?

PS : just realized I completely forgot about the Flayed Ones...

Tuesday, January 24, 2012

Tournament mission play test Battle Report


Yesterday with my buddy we tried out the first mission of my next tournament. It looks something like this :
Deployment : Pitched Battle
Objective :
- Each unit in the middle line at the end of the game is worth 1 point
- Each unit in the enemy deployment zone at the end of the game is worth 2 points
- A dedicated transport can't get a point if its unit is still on the board
- A scoring unit is worth one more point, if the unit is destroyed, the dedicated transport is only worth 1 point
- A unit can only be in one zone even if it spread out

It's a 1750 points game, I'm bringing my Necrons list I described before and my buddy is bringing his new Blood Angels. He's quite new with this army so he just brought what he thought is cool (this tournament is not a hardcore/WAAC one so it's fine).
His list :
Mephiston
Librarian Dreadgnouht
2 sanguinary priest : each with power weapon and jump pack
10 ASM : jump packs, 2 meltagun and Sergeant with power fist
6 ASM : meltagun + LasPlas Razorback
Vindicator : dozer blade

I don't have pictures because we were using a lot of proxy in this game mostly because I didn't finished to build my different sprues. It annoys me when I see battle report with proxy so I decided to skip taking pictures.

The Board : On the lower part of the table there are 3 pieces of terrain, 2 on the upper part and 3 other in the middle even if closer to the upper part.

I win the roll off so I decided to take the upper part of the board because I will need to cross the table and the terrain in this zone will help me to keep my guys alive.

Deployment :
Necrons deployment :
I deployed the Immortals and the C'tan in a piece of terrain on the left with the Command Barge and one Annihilation Barge behind. On the right side I putted one squad of Warriors in front ready to get into terrain next turn. I then putted the other Annihilation Barge on the right side as well and the Wraith in a piece of terrain behind the Warriors in case of emergency. Then I putted one Ghost Ark on each side of the table ready to zoom forward. And finally the scarabs are in the middle ready to get in a terrain next turn and then eat as much vehicle as possible before dying miserably. I decided to keep my Flayed ones in reserve so hopefully they will come late and get into his deployment zone via outflanking.

Blood Angels deployment :
On the right side, he decided to put Mephiston in a piece of terrain and the Dreadnought near by. One Razorback and Vindicator are in cover right behind them. On the left side, he putted the other Razorback and Vindicator in cover as well. He decided to keep his two jump pack ASM in reserve to get in my deployment zone or where they will be needed.
He rolled for Red Thirst and got one of the jump pack unit.

Necrons Turn 1:
Movement : I just move everything forward, the Warriors squad get into cover, the Command Barge go flat out into the center of the board.
Shooting : The Annihilation Barge on the right side shot Mephiston putting 7 wounds on him, he saved 3, he's now down to 2. Then 2 Cryptek from two unit of Warriors shot at him but only taking one wound, so he's down to 1 wound after first turn. The Scarabs run into terrain and spread out because of the Vindicator, I then decided to use my Solar Pulse

Blood Angels Turn 1:
Movement: On the right side, Mephiston and the Dreadnought cast Wings of Sanguinius and move forward, Mephiston in direction of the Command Barge and the Dreadnought in direction of the Warriors.   Both Vindicators move 12" to get as close as possible to be sure to get in range with Night Fight. Both Razorback move 6" but staying in cover.
Shooting : Mephiston ran to be in range for assaulting, Dreadnought pop smoke. The Vindicator on the left side shot at the Scarabs, scattered a little bit but still got 4 hits, but all of them are saved with cover save. The other Vindicator is just out of range thanks to the Solar Pulse. Both Razorbacks are out of range as well.

Necrons Turn 2:
The Flayed One decided so stay in reserve for this turn.
Movement : The Command Barge fly over Mephiston and kill him, and then get closer to the Dreadgnouht and Merykar disembarked. Everything move forward except for the Annihilation Barge on the right which just move back a little bit.
Shooting : The Ghost Ark shot at the Vindicator got one glance and Immobilized it (lucky) the Warriors inside Shook it. On the left side, the other Annihilation Barge shot at the Razorback get one pen and two glance, only one pen get through and it's weapon destroyed. C'tan ran 6" forward, Scarabs as well to assault the Vindicator. The Immortals ran into cover. On the right side two Cryptek shot at the Razorback but he made his cover saves. The Annihilation Barge shot the Dreadnought couldn't get through the adamantium plates.
Assault : Scarabs assaulted the Vindicator, got 9 hits, then lower the armor of 6. I got 2 glance and 7 pen. It ended up with the Vindicator being wrecked. The Scarabs consolidated 5". The Overlord assaulted the Dreadgnought, it goes first and put one wound on the Overlord but he passed his invul, then the Overlord swung his Warscythe and get one pen and one glance, the Dreadnought is Immobilized and Shaken.

Blood Angels Turn 2:
Both Jump Packs ASM came from reserve.
Movement : Deepstrike one ASM in the center of my deployment zone just behind my ghost ark and the other one on the left side of my deployment zone behind my Annihilation Barge. On the left side, the ASM disembarked and get into terrain (one dead because of the C'tan power) and the Razorback move 12" forward. On the right side, the Razorback zoomed forward and pop smoke and the Shaken Vindicator pop smoke as well.
Shooting : The disembarked ASM unit shot at the Scarabs taking one flock from bolter shots. On the left side, the jump pack ASM shot at the Annihilation Barge exploding it. The other jump pack ASM shot at the Ghost Ark and exploded it as well killing two Warriors but one stand back up.
Assault : The combat between the Dreadnought and the Overlord continues and nothing happened.

Necrons Turn 3:
The Flayed Ones decided to show up.
Movement : The Flayed ones popped on the left side of the board ready to assault the disembarked ASM. C'tan move backward in direction of the deepstruck ASM. The Immortals and both Warriors move forward. On the right side the Annihilation barge and Ghost Ark move forward, the Wraiths get closer to the ASM for assault. On the left side the Scarabs get ready to assault the ASM.
Shooting : Ghost Ark shot the Vindicator, got 2 glance, weapon destroyed and immobilized so it ended up wrecked. The Warriors inside shot at the Razorback but nothing happened. 2 Cryptek from two units of Warriors shot at the ASM in the center and killed one. On the left side, the Immortals shot at the ASM and killed 2, the Annihilation Barge failed to add any number to those casualties.
Assault : C'tan assaulted the ASM on the left side killing 3 of them and got no wound back. The Wraiths assaulted the ASM in the center. Two died before even having the chance to hit but they still killed two of the marines and then passed their Ld test. The Flayed Ones and the Scarabs ganged up on the small squad of ASM killing all but the Sergeant and got only one wound back on the Scarabs. The Sergeant failed his Ld test and died from No Retreat. The Scarabs consolidated in direction of the Razorback and the Flayed Ones spread out in cover. The combat between the Overlord and the Dreadnought continues.

Blood Angels Turn 3:
On the right side, the Razorback move 6" and the ASM disembarked. On the left side, the other Razorback move 12" in my deployment zone.
Shooting : ASM shot a meltagun at the Annihilation barge on the right and get its Tesla Destructor out. The Razorback shot at the Warriors killing 2 but they passed their Ld test.
Assault : Finally the Overlord wrecked the Dreadnought and consolidated 3" in direction of the ASM. The Wraith killed 1 marine and one wound is putted on one of them. C'tan killed 4 marines and got nothing back. They failed their Ld test and the Sergeant died to No Retreat letting only the Sanguinary Priest in combat.

Necrons Turn 4:
Movement : Warriors and Immortals moved forward. Ghost Ark on the right side zoomed 12" forward. The Annihilation Barge moved forward of 6" ready to shot its small gun. The Overlord moved in direction of the disembarked ASM. The Scarabs moved in direction of the gunless Razorback on the left side.
Shooting : both Warriors squad ran forward. Immortals shot the disembarked ASM killing the meltagun carrier. The Annihilation barge spotted them as well but nothing happened.
Assault : The Overlord charged the ASM, they putted 3 wounds on him but he passed all his invul saves and killed 1 guy. The Wraith killed one guy as well and passed all they invul saves. The C'tan finished of the Sanguinary Priest and consolidated in direction of the Wraiths combat. The Scarabs assaulted the Razorback, 5 hits, lowered the armor of 3, got 2 pen, shaken and stunned.

Blood Angels Turn 4:
My mate decided to concede at that point because it was clear that he couldn't do anything else now.

Overall a fun game. This mission scenario is pretty interesting because it really force us to move forward so it could end up with a big mess in the middle with some armies. I could see that I didn't use much of the C'tan power so maybe I should tweak my list to get some Cryptek with tremorstaves. My opponent made quite a lot of mistake, but it's how we learn! I did learn as well with this game.

Next time I will fight against a Full Reserve Tyranids list and I think with my current list it could be a pretty tough game.

It was my first Battle Report so if you have any advices on how to make them better, just leave a comment.
Stay tuned.


Wednesday, January 18, 2012

1750 pts Tournament List


So a 1750 pts Tournament. In my country (France) a lot of the event are restrictive when it comes to list building, most of the time it's not possible to fill up the slot with the same entry or when it is allowed it comes with a huge penalty. So it comes down to us to make a choice, ultra competitive with all the restrictions that come with it or a more open but which can struggle against better list building (of course the opponent is a big factor as well). I personally don't really mind most of the time cause I usually build my army around one or two units that I like because of their rules, models or fluff.

That's why here I started with Anrakyr for the reason I have started before, but because of the recent FAQ I can't use him as I planned to. Here comes Merykar and his followers. So now, let's talk about the list :

HQ :
Overlord (Merykar) : Warscythe, Mindshackle Scarabs, Phase Shifter, Sempiternal Weave, Cattacomb Command Barge 255 pts

Royal Court :
3 Cryptek : Harbinger of Destruction 105 pts
1 Cryptek : Harbinger of Destruction, Solar Pulse 55 pts

Elite :
C'Tan Shard : Writhing Worldscape, Lord of Fire 230 pts
5 Flayed ones : 65 pts

Troops :
5 Necron Warriors : 65pts
+ Ghost Ark 115 pts
5 Necron Warriors : 65pts
+ Ghost Ark 115 pts
5 Necron Warriors : 65pts
5 Necron Immortals : Tesla Carbines 85 pts

Fast Attack :
8 Canoptek Scarabs : 120 pts
6 Canoptek Wraiths : 2 Whip Coils 230 pts

Heavy Support :
Annihilation Barge : 90 pts

Total : 1750 pts

So here the strategy : it's pretty straight forward, shoot shoot shoot. I keep my Wraiths and C'Tan Shard in the backfield with my troops in case something too frightening (which is almost anything against my troops) come by. I use the power of the C'Tan to make additional casualty  while the opponent advance. The Annihilation Barge is one of my favorite unit in this codex, I think that for 90 pts it's really a bargain for the dakka we got. The Overlord can zoom forward and try to sweep some juicy target before being blown up or stay back at the beginning wait for that the opponent come to me. I gear him so he can also handle small unit by himself, he can be pretty nasty in fact.
The Flayed ones are pretty bad in the current edition, but in my list they will help lower my comp value and hopefully frighten some backfield devastator for example. I actually love the model even if I think they are overpriced but anyway I'll get at least one unit for the pleasure of painting.
And finally I got the scarabs and troops, the scarabs are pretty much here if there is AV 14 and if not to eat one transport before getting flamed to death. The troop can provide a decent amount of fire and is pretty versatile. I can use the cryptek to aim for transport and the warrior can also help on that (even if don't really count on it). I got one unit of Immortal because on my previous list I had Anrakyr and that made them automatically Pyrrhian Eternals but now they will just bring a small bump in fire power where need.

That's pretty much it, what do you think about the list, some improvement, or things I missed?
Keep tuned

My Necrons


Like I already said, I really enjoy the Fluff behind the Necrons and especially the one about Anrakyr The Traveller. The guy is just trying to wake up all the sleepy babies and avenge the one whose been annihilated. I pretty much like the aspect of the lonely knight doing his duty even if all of his kind despite him for it.

From the Hobby side, it's just perfect for me because my paint scheme is pretty dark right now (mostly metallic and red) but with the fluff of Anrakyr I can just add different units from different dynasties so it can cut the monotone feeling of the army. That why my army will be a mix a red and green sleepy robots and I can't wait to see the results on the table top.

I also enjoyed the rule of Anrakyr with the Mind in the Machine especially in a command barge, but the recent FAQ just invalidated it from this use. That's why I will go with a generic Overlord for the purpose (I'm actually really disappointed because I think Anrakyr really lost his use if it's not for Apocalypse game).

I can see that after the awakening of his Tomb World by Anrakyr, Merykar of the Novokh dynasty (my Overlord) totally embrace the cause of Anrakyr and started to travel as well to seek for slumbering Tomb Worlds in hope of rally more and more dynasties behind this objective. He recently help to wake up the Tomb World of the Khryn dynasty and push back an orc offensive on their Tomb World. For that, the Overlord gave a part of his troops to continue the infinite quest of his savior.

In April, I should attend a 1750 pts Tournament, so next time will be my list.
Keep tuned

Introduction


Hey, so like everybody those days I'm lunching a blog of my own. I've been playing to 40k for now 4 years. I started during the 4th Edition with AoBR set. I played principally with Marines, Tyranids and Ork at the time. Then I had a break for 2 years but now I'm back to the game. I really enjoy the change brought by the 5th Edition but when I came back after learning all the changes in the rules I just realized that my armies were outdated in their build. So I've been reading a lot of blog out there and gather as much informations as I could and decide that big changes will come. Firstly my armies, I really enjoy my Tyranids but they just destroyed them and it's getting really hard for me to pull anything with them without buying a lot of new stuffs which would be difficult looking at the price of this race. Then I got my ends on the Dark Eldar Codex and I can say that I really enjoy this one, it's full of opportunity and it's really easy to pull out a lot of different build and let's face it, the models are stunning.

And here come the new Necrons, just felt in love with the background and the army list, I got the same feeling for the Necrons that the Dark Eldar, there are for every taste (even if it's a little bit harder to pull something out of the Necrons than the Dark Eldar to my taste. So I just decide that I will start again with them, I ended up buying few units and starting pairing up them. I still have a long way to finish them cause despite how quite they can be painted up if you just go for heavy dry brushes, I wanted something a little big more eye catching. I will upload pictures of them as soon as I get an idea of how to make good pictures.

The blog by itself will be just me gathering my thoughts of the game, rumors and fluff of this universe we all enjoy so much.

That's all for the Introduction,
Stay tuned!